Although laboratory work comprises about 80% of my waking life, only a small proportion seems to be making it onto this blog. The main reason for that is because lab work is not very interesting to most people, so I try to keep the focus more on life in Korea.
But I found out through my over-performing Sitemeter that some readers are starting to find this blog through science related searches. Often times I'll try looking for a protocol on Google, and the only results that come through are too technical to be useful.

To that end, I've decided to occasionally put some of our lab work up here, in the hopes that some of it will be useful to a perplexed undergrad student somewhere.
The protocol that we're going through today is GFP biolistics bombardment (only the machine part). A protocol is the science name for the 'recipe' of an experiment, and GFP is a fluorescent protein (think of deep-sea jellyfish or glowsticks). Biolistics involves coating gold or tungsten bullets with modified DNA and literally shooting it into the heart of a living cell. It was pretty revolutionary a few years ago, but has since been eclipsed by Agrobacterium-mediated transformation. In the photo above, Chen-Jing is peeling onions, in preparation for the experiment.
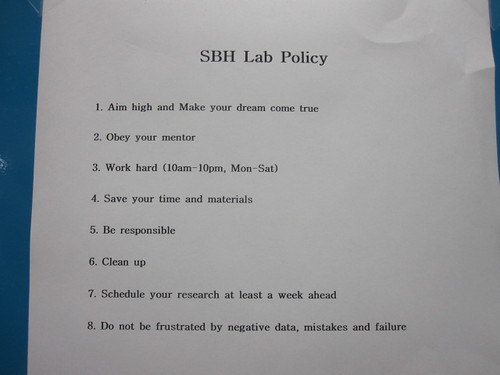
But first, let's have a look at this list they've posted up at the biolistics lab at Sejong University. I'd say it pretty much sums up the working conditions of Korean graduate students.
Except that we normally work longer than that.

This is what bacteria looks like when you grow it in a test tube. Bacteria are obviously too small to see, but the liquid they're in will turn cloudy when there's enough of them. In a typical inoculation, a few hundred cells will multiply into billions in just 16 hours. So imagine a classroom of kids multiplying into the population of the world overnight.

This is the biolistics machine. It's basically a crude particle accelerator that uses helium gas to propel the charge downwards. Make sure you've opened the main tank valve and connected the vacuum pump securely. The device is remarkably simple to use, but don't operate it by yourself the first time.

The first thing you need to do is unscrew the large metal nozzle in the chamber. Use tweezers to transfer a sterilised rupture disk into it and make sure it sits flat. The purpose of the rupture disk is to hold back the air pressure to a specific point, like 1000 psi, after which it will burst and fire the charge. You can change the specific pressure by changing the value of the disk.
But why do you need to change the pressure? It's because some plants have thicker skins than others, and you have to make sure you get the pellets inside the cell.

Then you take out the tray that normally sits directly under the rupture disk. Take it apart and put a gauze mat in it. This protects your sample from getting obliterated by the macrocarriers.
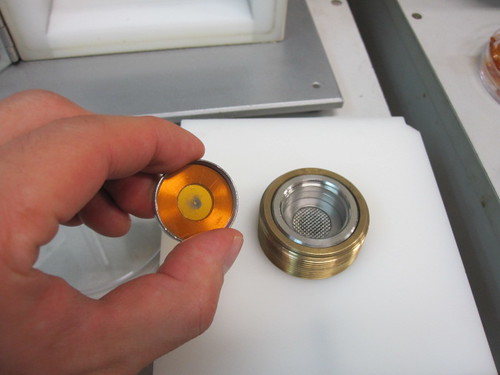
Next, put your macrocarrier holder facing downwards onto the circular top of the tray. The macrocarrier holder is the brown plastic circle that has your dried DNA on it. Prior to this, you need to have coated the metal pellets with your DNA and dried it with ethanol. The black spot in the middle is the tungsten residue.

Then you screw the metal clasp on top. It should all fit together very simply, like a Meccano set.
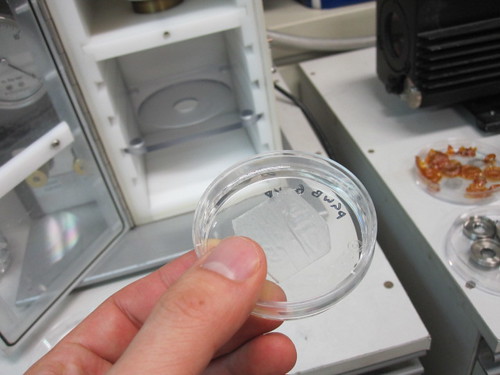
Put the tray into the chamber and get your sample ready. The best thing to use for GFP is onion cells, because they're big and clear so you can see them easily under the microscope. Unfortunately though, they don't have chloroplasts (green things responsible for photosynthesis), which means you can't really extrapolate the results to situations in leaves. They also have rather large vacuoles (empty spaces) right in the middle of each cell, so you need to be careful when you interpret your photos. But anyway, they're a good starting point.
You need to peel the slivers of onion skin that come from the middle of the onion when you cut it. An onion is just layers of bulbs, like Russian dolls, all layered on top of each other. Take the bulb in the middle that is around half the circumference of the entire onion and you'll find it has a thin skin sheath around it (like all of them). Cut a little square out of that and put it on 0.5% Murashige and Skoog media.

Okay, so now you put the sample underneath the firing apparatus. Remember to take the lid off the plate.
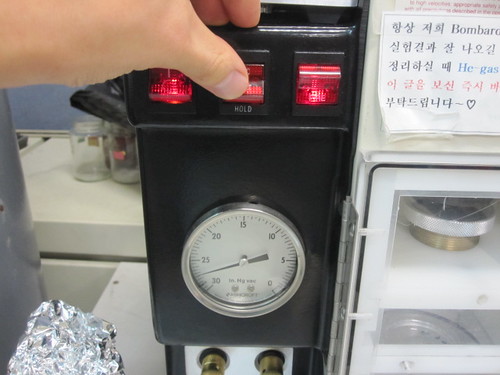
Close the door tightly. Hold the middle vacuum switch down until you can see the pressure gauge reach 27. When this happens, quickly switch it over to 'Vent', and the value should stay constant. Then hold down the 'Fire' button until the secondary pressure gauge (the one on top of the vacuum chamber) reaches around 1000 psi. You keep holding it until you here a popping sound, which is the sound of the rupture disk breaching.
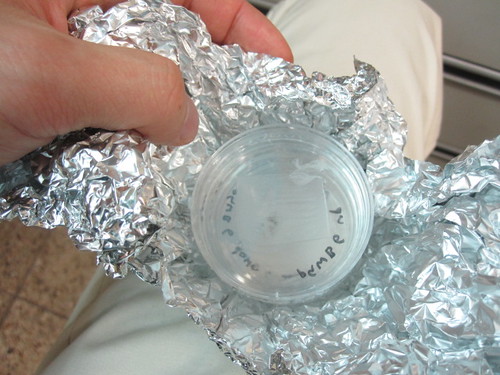
Release the button, remove the plate from the chamber and wrap it in aluminium foil. Store overnight for around 12 hours, in the dark at 28 degrees C. The next day, prepare microscope slides and dye stains of your samples.
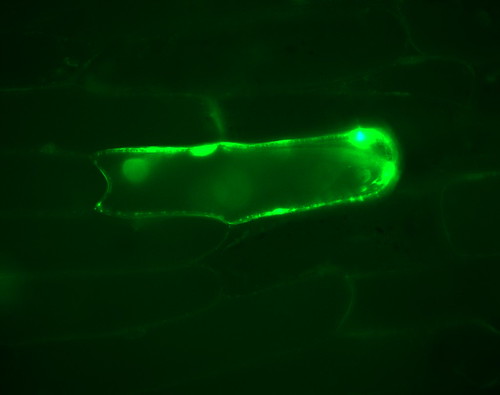
And this is what you'll see in the microscope the next day if you've done everything right. Dazzling, bright and beautiful. Make sure you have the right filter set on, and you shouldn't have to search very far. Real GFP fluorescence jumps out at you in a very conspicuous way. If you find yourself squinting at a faint blur and wondering if it's a real signal or not, you might need to adjust your incubation time or plasmid concentration.
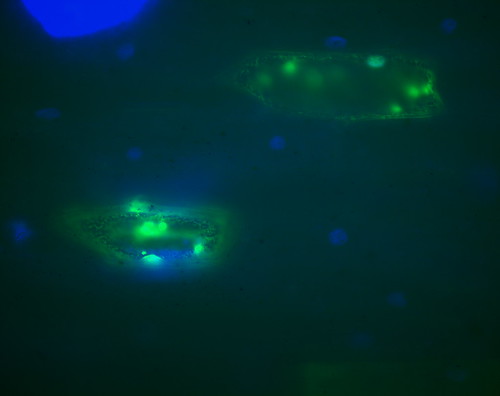
My first picture was nice and bright, but it was too intense to be useful. After a bit of fine tuning I ended up getting this photo above, which shows some nicer details of the onion cells. The green blobs are localisation positions of my fusion protein, and the blue colour is DAPI staining, which highlights the nucleus.
So basically, what you're seeing is the DNA of a glowing jellyfish protein, fused to a bacterial protein, that was then shot into an onion cell which managed to translate it. It's the convergence of three kingdoms of nature, brought together through biotechnology. Cool, hey?
If you're having trouble with your protocol, send me an email and some of your photos and I'll try and help you out.
That's all for me this time. Happy bombarding everybody!
But I found out through my over-performing Sitemeter that some readers are starting to find this blog through science related searches. Often times I'll try looking for a protocol on Google, and the only results that come through are too technical to be useful.

To that end, I've decided to occasionally put some of our lab work up here, in the hopes that some of it will be useful to a perplexed undergrad student somewhere.
The protocol that we're going through today is GFP biolistics bombardment (only the machine part). A protocol is the science name for the 'recipe' of an experiment, and GFP is a fluorescent protein (think of deep-sea jellyfish or glowsticks). Biolistics involves coating gold or tungsten bullets with modified DNA and literally shooting it into the heart of a living cell. It was pretty revolutionary a few years ago, but has since been eclipsed by Agrobacterium-mediated transformation. In the photo above, Chen-Jing is peeling onions, in preparation for the experiment.

But first, let's have a look at this list they've posted up at the biolistics lab at Sejong University. I'd say it pretty much sums up the working conditions of Korean graduate students.
Except that we normally work longer than that.

This is what bacteria looks like when you grow it in a test tube. Bacteria are obviously too small to see, but the liquid they're in will turn cloudy when there's enough of them. In a typical inoculation, a few hundred cells will multiply into billions in just 16 hours. So imagine a classroom of kids multiplying into the population of the world overnight.

This is the biolistics machine. It's basically a crude particle accelerator that uses helium gas to propel the charge downwards. Make sure you've opened the main tank valve and connected the vacuum pump securely. The device is remarkably simple to use, but don't operate it by yourself the first time.

The first thing you need to do is unscrew the large metal nozzle in the chamber. Use tweezers to transfer a sterilised rupture disk into it and make sure it sits flat. The purpose of the rupture disk is to hold back the air pressure to a specific point, like 1000 psi, after which it will burst and fire the charge. You can change the specific pressure by changing the value of the disk.
But why do you need to change the pressure? It's because some plants have thicker skins than others, and you have to make sure you get the pellets inside the cell.

Then you take out the tray that normally sits directly under the rupture disk. Take it apart and put a gauze mat in it. This protects your sample from getting obliterated by the macrocarriers.

Next, put your macrocarrier holder facing downwards onto the circular top of the tray. The macrocarrier holder is the brown plastic circle that has your dried DNA on it. Prior to this, you need to have coated the metal pellets with your DNA and dried it with ethanol. The black spot in the middle is the tungsten residue.

Then you screw the metal clasp on top. It should all fit together very simply, like a Meccano set.

Put the tray into the chamber and get your sample ready. The best thing to use for GFP is onion cells, because they're big and clear so you can see them easily under the microscope. Unfortunately though, they don't have chloroplasts (green things responsible for photosynthesis), which means you can't really extrapolate the results to situations in leaves. They also have rather large vacuoles (empty spaces) right in the middle of each cell, so you need to be careful when you interpret your photos. But anyway, they're a good starting point.
You need to peel the slivers of onion skin that come from the middle of the onion when you cut it. An onion is just layers of bulbs, like Russian dolls, all layered on top of each other. Take the bulb in the middle that is around half the circumference of the entire onion and you'll find it has a thin skin sheath around it (like all of them). Cut a little square out of that and put it on 0.5% Murashige and Skoog media.

Okay, so now you put the sample underneath the firing apparatus. Remember to take the lid off the plate.

Close the door tightly. Hold the middle vacuum switch down until you can see the pressure gauge reach 27. When this happens, quickly switch it over to 'Vent', and the value should stay constant. Then hold down the 'Fire' button until the secondary pressure gauge (the one on top of the vacuum chamber) reaches around 1000 psi. You keep holding it until you here a popping sound, which is the sound of the rupture disk breaching.

Release the button, remove the plate from the chamber and wrap it in aluminium foil. Store overnight for around 12 hours, in the dark at 28 degrees C. The next day, prepare microscope slides and dye stains of your samples.

And this is what you'll see in the microscope the next day if you've done everything right. Dazzling, bright and beautiful. Make sure you have the right filter set on, and you shouldn't have to search very far. Real GFP fluorescence jumps out at you in a very conspicuous way. If you find yourself squinting at a faint blur and wondering if it's a real signal or not, you might need to adjust your incubation time or plasmid concentration.

My first picture was nice and bright, but it was too intense to be useful. After a bit of fine tuning I ended up getting this photo above, which shows some nicer details of the onion cells. The green blobs are localisation positions of my fusion protein, and the blue colour is DAPI staining, which highlights the nucleus.
So basically, what you're seeing is the DNA of a glowing jellyfish protein, fused to a bacterial protein, that was then shot into an onion cell which managed to translate it. It's the convergence of three kingdoms of nature, brought together through biotechnology. Cool, hey?
If you're having trouble with your protocol, send me an email and some of your photos and I'll try and help you out.
That's all for me this time. Happy bombarding everybody!
16 comments:
I tried to follow it, but the one part of biology that never really grabbed my interest was genetics.... I was an envi sci major and really only wanted to study ecology... maybe a little micro, but I couldn't be bothered with DNA... way over my head...
But, I do like things that glow....
You don't need to know a lot about genetics to get a good result. It's about as difficult as making a chocolate milkshake.
Well... that is if someone has already made the chocolate for you.
What was the final concentration of your plasmid DNA? I've been thinking about trying this technique, but I'm fairly naive with the equipment. I'm a graduate student in plant genomics at the University of Alabama. if you could you e-mail me more information on this protocol that would be greatly appreciated. E-mail address: antic001@crimson.ua.edu. Thanks so much! Pictures look beautiful! GFP is always so visually pleasing.
Hello Jay. The final plasmid concentration should be at least 1 microgram per microlitre. I'll send you my protocol...
I've used that brand of biolistics machine before. Quite a few people forget to take the lid off the petri dish.
Pity mammalian cells don't like them, I have to use micelles or better yet, electrotherapy :)
hi, can i check with you for coating of tungsten particles onto dna, must the protocol be followed in sequence? as in adding spermidine, then dna then glycerol and CaCl2? or these need not be added in sequence? thanks so much.
Yes, it is important to add everything in the right sequence. Otherwise the DNA will not stick to the microparticles.
Your images look really nice. What protocol did you follow for the DAPI staining because i am not sure whether to fix the tissue or not?
3 rinse/wash cycles for DAPI. It depends on the kinds of cells you're looking at.
Hello ..its amazing to see you getting such a nice gfp images..iam too trying the thing but with agro..we dont have gene gun in our lab ..i am working with DNA reapir genes and is trying to localize them ...do you have any protocol based on agro bacterium for onion peel transient transformation ..it seems mine one is not that much efficent right now...mine email id is -- himanshu22moon@gmail.com..thnaz in advance
The gene gun is best used for onion, but you can try agroinfiltration. I haven't done it myself, but there are plenty of protocols online. Infiltration is good for leaf tissue like tobacco.
hello ma'am... you have done a great piece of work... i have to ask you what is the size of rupture disc you have used for onion cells for GFP expression.
Hi. Greetings from India! I read one of the comments on the importance of right sequence- spermidine, dna, glycerol and CaCl2. I am trying gold particles in glycerol followed by dna followed by mixture of spermidine and CaCl2. Am I doing it right? Also, how do you stain the peel with DAPI 1ug per ml working concentration? and how to perform wet mount of the peel? In glycerine or plain MQ water? Can you please email me your protocol...? dvlavania@yahoo.co.in
Thanks .. :)
Hello, while google around for some time, I found your very nice and beautiful GFP images. I am sticking in a same experiment using onion epidermis, I do not quite sure about the DAPI staining procedures after the bombardment and incubation, So would you please share your protocol with me, my email supnovel@sicau.edu.cn. Your help will be cited in any manuscripts in the near future.
Hello,
I am trying to transform onion cells by bombardment. However hard I try, I just can not do it... I have several questions :
- After how long you observe the transformed cells ?
- Could you say me the distances that you have between rupture disk and macrocarrier and between stopping screen and target shelf ?
- How many cells are transformed for 1 shoot ? (just to have an idea)
- Is it important to work with fresh plasmids or not ?
I need your help :)
Thank you in advance
Best regards
Post a Comment